In the first two blogs we looked at the various methods you can employ to switch users from network licenses to Sign in (userID) licenses. Hopefully, this has enabled you to create a plan for switching users’ desktop applications.
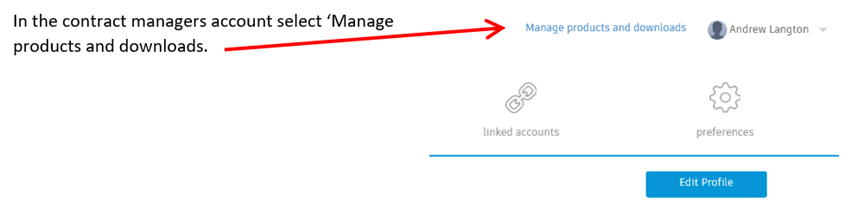
It is now time to copy users from the Classic User interface into the By User interface or add users if they do not already have an account (all newly invited users will show as pending until they verify their account). If users do not receive a verification email check their spam folder.
Teams
Teams only apply to the new by user/ by product interfaces. A new subscription contract when purchased will appear in the teams dropdown as the primary admins ID + (a four-digit number). If your contract currently has a mix of network and user ID licenses, then the switched network / user ID seats will appear under the team of the same contract in the by user / by product interface. Users can be part of more than one team where necessary.
Teams can be renamed in the Primary Admin account, you can for instance rename a team as London and another as Birmingham. Teams and the contract contents can only be created and amended by Autodesk.
Just as I mentioned in the previous blog, now is a good time to re-evaluate your software estate and users. Look in both the classic user interface and the By User interface and unassign any users who do not need access to the products, if they have left the company then you can remove them (remember you must to unassign all products and services from them first).
Contract Administrators, Primary Admins and Software coordinators, and Secondary admins can copy / invite users, either individually or by bulk import. If you are assigning users to sign-in licenses already you can skip to the Adding users using the import feature section below.
When inviting / assigning users make sure you have the team selected that includes the software you wish to assign to the user.
Adding Users Individually
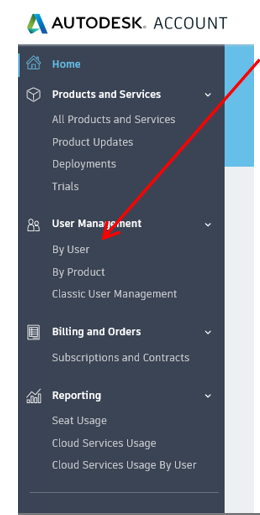
In the menu on the left select ‘By User’
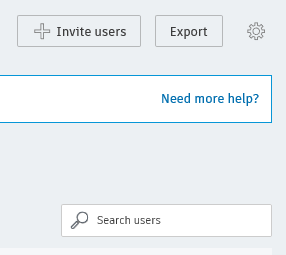
Select ‘Invite Users’ button.
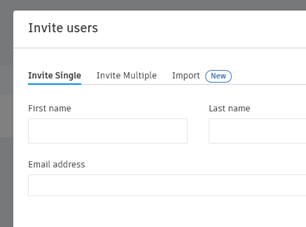
Enter the details in the boxes and select ‘Send invitation.’
Do this for each of the users to be added.
All users will show as pending until they have verified their account (Verification email from Autodesk)
Adding users using the import feature
In order to add users in bulk a list of users needs to be created in CSV format. If you wish to add users in bulk from an excel document it should have a header row of first_name, last_name, and email. Then enter the user’s information below each header (the header row is ignored on import).

Export or save as ‘filename.csv’
In the ‘By User’ section of the Autodesk account, select ‘Invite Users’ and then select Import.
Browse to the location of your saved csv file and import.
Duplicate entries will be ignored.
Adding users exported from the classic user interface
If you already have the list of users in the classic user interface, open it up and from the dropdown button above the names select Export.
Save the file and open it in Excel
Only columns A, B & C are required, select, and delete the extra columns. The list will now contain multiple duplicate entries for each of the users. To remove the duplicate users, highlight cell A1 and select all (ctrl+a).
On the Data tab select ‘Remove Duplicates’. Ensure all three column boxes are ticked and tick the box ‘My data has headers’, then OK, click OK on the information box and the list should now contain only 1 entry per user.
Export or save as ‘filename.csv’
In the ‘By User’ section of the Autodesk account select ‘Invite Users’ and then select Import.
Browse to the location of your saved csv file and import.
Once imported each user will need to be assigned the products.
I hope you have found this blog on "Moving users from the Classic User interface to the By User interface" helpful.
For more information on Transitioning to Named User, please have a look at our webpage here or please contact us on 0345 370 1444 or email info@symetri.co.uk
If you have missed the first two parts of our "Transition from Network / Multi-User licenses to Autodesk ID licenses," blog series or want to read the following parts of the series, you can find them below:
Part 1 | Introduction and 2018-2019 licence reset: Click here
Part 2 | Reset licences for 2020 and 2021 products: Click here
Part 4 | Assigning users in the Contract Managers account: Click here
Part 5 | Whitelist/Access requirements for Autodesk ID Subscription Licenses: Click here
Part 6 | Decommissioning the network license service on the server: Click here
Part 7 | Cleaning up your estate: Click here
Watch our webinar recordings below to find out more about the Autodek 2-for-1 Licensing Offer and What the Transition to Named User is and what you need to know.
Autodesk's Transition to Named User | Licensing 2-for-1 Offer: Webinar Recording
Watch this webinar recording to learn more about Autodesk's Transition to Named User and the Licensing 2-for-1 offer. Watch recording here.
Autodesk's Transition to Named User: What it is & what you need to do: Webinar Recording
In this session, learn about Autodesk's Transition to Named User initiative and what you need to do to prepare for this change. Watch recording here.

Author
Andrew Langton
Andrew joined us in 2018 as an Applications Engineer. He gained his HNC in Building Studies whilst working for a leading Architectural Practice in the midlands. For 15 years prior to joining us, he was a CAD Manager/IT Support Technician working closely with the IT manager. This unique role and technical background enabled Andrew to balance the requirements of Information Systems, CAD Management, Architects and Technicians. His experience in Software Licensing, Compliance and Deployment Strategies in both Physical Workstation and Virtual Machine environments help him to support our partners through the decision making process.


