In the previous blogs, I have looked at the structure of BIM 360, configuring titleblock extraction, drawing and model compare, and a fleeting look at the “Issues” functionality. In this blog, I will delve deeper into “Issues” and their configuration and management.
There are a number of aspects to be considered when configuring BIM 360 Issues: permissions, issues types, root causes, status set, custom attributes and issue templates (included within field management).
When considering these individual sections, we should take a holistic view, outside that of a single project, since most of what we configure here can form the basis of future BIM 360 projects. In explanation of that statement, when we create a new project there is the option to copy the settings from another (template) project. These settings include issue types, root causes, and any custom attributes created. The full (current) list is recorded in the help pages, and I have included an extract here.
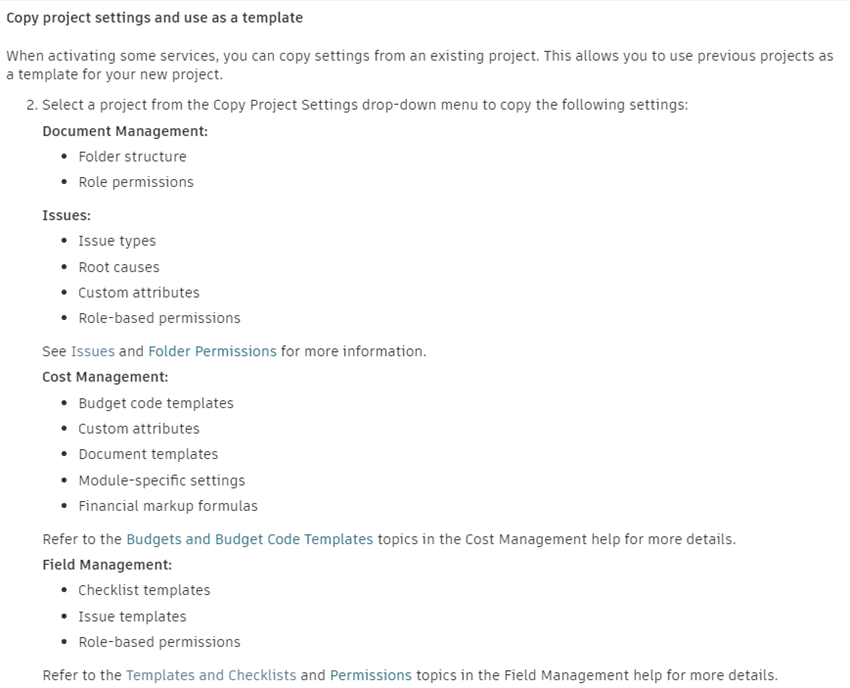
Fig 1. Project Template Settings
Issues Types, Root Causes, and Custom Attributes
If your organisation has well established metrics for measuring project delivery, then you should configure your issue types and root causes to match, insofar as that is possible. If the deployment of Autodesk BIM 360 presents you with the opportunity of defining and tracking such metrics, then try and strike a balance here. There is little point in defining hundreds of issue types and sub-types, and the same for root causes, if this results in failure to select the correct values when creating issues, or the system is seen as so complex that its use is resisted. Equally, if there are too few risks, is the information and metrics gathered providing no real insight into how successfully projects are progressing?
When creating issues, there is a free text “Description” field. Encouraging its use, and regularly reviewing those descriptions and comments may highlight the need for an additional issue type, or root cause. The slate is not blank when we begin, there are pre-defined issue types and root causes, and these can be added to as required. It is worth noting here that pre-defined issue types and root causes cannot be deleted, rather they are flagged as inactive. Custom issue types and root causes may be deleted, if they have not been used, otherwise they are best also flagged as inactive.
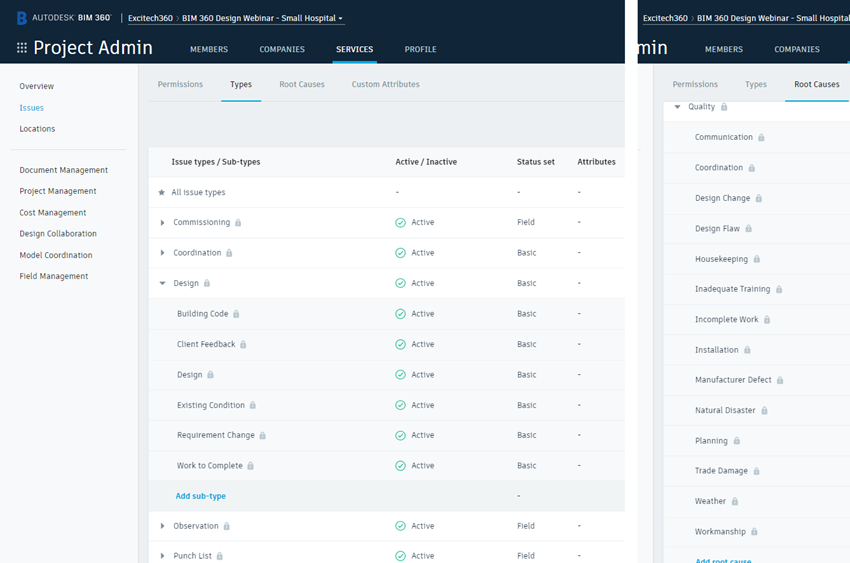 Fig 2. Autodesk BIM 360 Pre-defined Issue Types and Root Causes
Also, to configure are any custom attributes that you wish to be included when issues are created. These may well prove more challenging than the issue types and root causes. However, it should be understood that not all fields might be completed when the issue is first created, that this additional information could be added later, once there is complete understanding of the issue. Note that there is also the option to make a custom attribute mandatory if this is required.
Perhaps obviously, there are no pre-defined custom attributes. In configuring them, it is possible to create 4 different types of custom attribute: text, dropdown, paragraph, and numeric.
 Fig 3. Custom Attribute Types
In the examples shown below, priority might be flagged as a mandatory field, with cost and programme implications being added after the initial creation. Once created, these can be assigned to a specific issue type and sub-type, and entire issue type, or indeed all issue types (and sub-types). Again, there is a balance to be struck, between gathering useful, relevant information, and making the task of creating issues an onerous one.
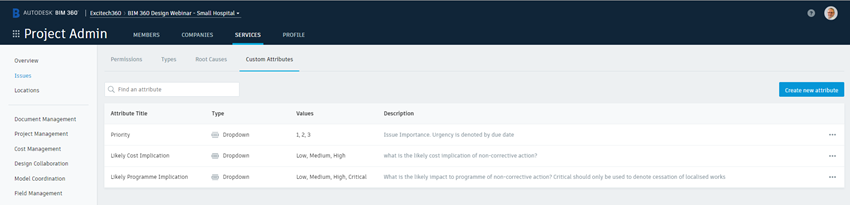 Fig 4. Autodesk BIM 360 Custom Attributes
Status Sets
When considering issue types, root causes, and custom attributes, the type of status set to assign to each may be of use. There are 2 status sets in BIM 360: Basic, and Field. Each has a set of pre-defined status flags for identifying at what stage an issue is in its lifecycle.
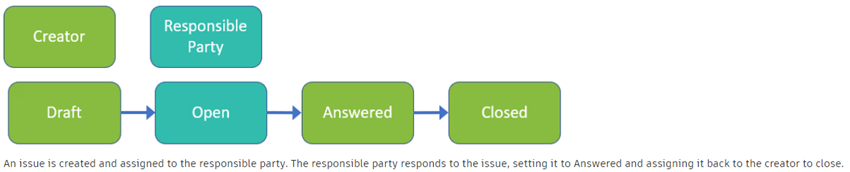 Fig 5. Basic Status Set
The basic status set is ideally suited to earlier, design stages, for drawing and coordination reviews, for example.
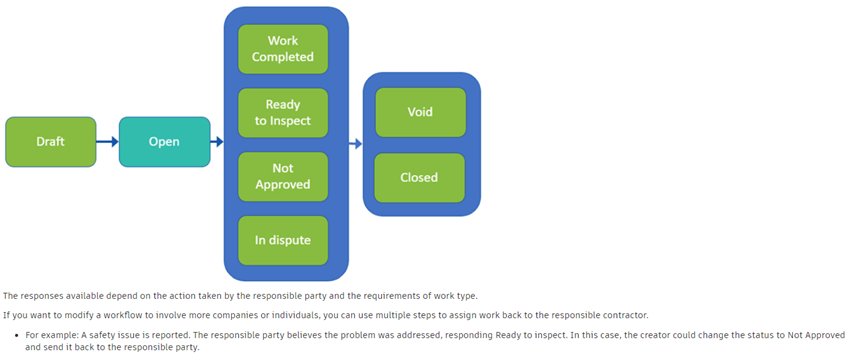 Fig 6. Field Status Set
The Field status set is better suited to the construction stages, for commissioning, quality, and safety inspections. An example might be where a trade contractor has to resolve a site-based issue (e.g. a snag) and provide photographic evidence of the completed work. He would then move the status to work completed, and the originator can close.
The ready to inspect status is useful for when a client or consultant creates an issue. The issue is then directed to the correct trade contractor by the main contractor (MC). When the trade contractor has resolved and changed the status to work completed, the MC changes to ready to inspect, and the originator can close out.
Permissions
Fortunately, setting Issue permissions is rather more straightforward. There are four options: View All, Create, View and Create, and Full Control. The official explanations are self-explanatory, noting here that any project administrators will always be granted full control.
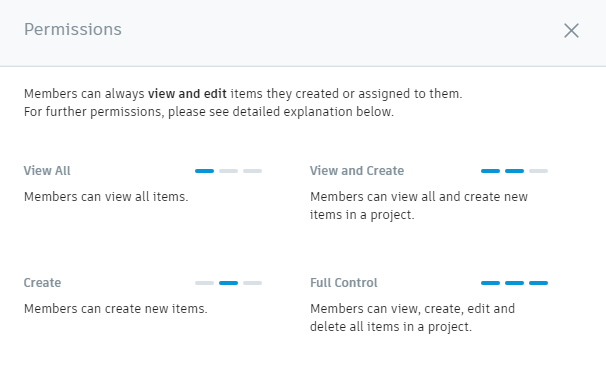
Fig 7. Autodesk BIM 360 Issue Permissions
One further thing worth noting at this point is that issues may, and often will be, raised against a specific file (drawing or document) in BIM 360: the assignee of an issue will be able to view the linked file without being granted permission to the folder where that file resides. This, understand, is a good thing, since it removes the necessity of granting sweeping “view” privileges across the project.
Issue Templates
For those also subscribing to Autodesk BIM 360 Build, there is the facility for creating Issue Templates. These make the task of creating very much quicker, by being able to pre-populate much of the information in the issue creation form. These are particularly useful where a specific task might result in a number of issues being created that share common information, for example the issue type, root cause, location details, assignee. Even the initial status is set. This is an interesting one: by default, an issue will be set to “open” status when it is created. This results in the issue being assigned and prompting an email notification being sent, but there is another status available, “Draft”. In this state, no email notification is generated, giving time to review and even amend these issues before setting them to “Open” and assigning them for resolution.
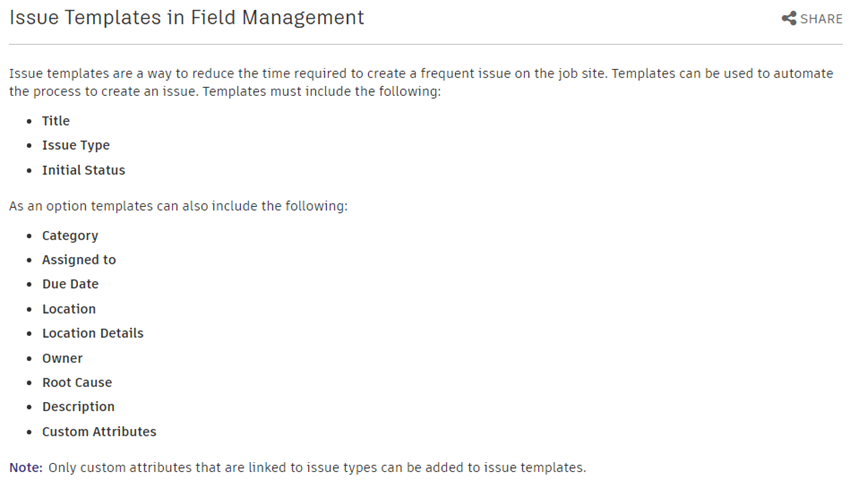
Fig 8. Issue Templates (Field Management)
In Conclusion
There are a great many things that must be considered when setting up Autodesk BIM 360 Docs, each individual feature being intrinsically linked to others. There really aren’t any wrong ways to set these up, each organisation being distinct from the next, but I would encourage you to give credence to the best practices of change management, and in particular the inclusion of all stakeholders in the process. It is an often-overlooked fact that where users of any new system feel that they have not been included, and that the system is simply foisted upon them, that they may resent and resist the deployment, undermining its real usefulness.
I hope this has given you an insight into what Autodesk BIM 360 Docs can do for your projects, particularly as more and more of us begin adjust to the new normal of remote working.
Additional Resources
Autodesk BIM 360 Docs | Overview Part 1
Autodesk BIM 360 Docs | Overview Part 2
Look out for the next part in this blog series. You can find more information on Autodesk BIM 360 Docs on our webpage: https://www.symetri.co.uk/en/Products/BIM-360-Docs.

Author
Johnathan Ward
From a background in both the construction and manufacturing industries, Johnathan has gained a detailed working knowledge of both the processes and workflow methodologies employed in achieving the optimum operational performance.


